This blog is about how to access openstack dashboard outside the virtual machine.
Configuration Details:
In order to access OpenStack outside the Virtual Machine, you have to make few network settings in the hypervisor. Here, I have made use of Virtual Box to enable certain configuration.
The idea is the same but the way we do may differ from hypervisor to hypervisor. Check your hypervisor's complete details on network configuration.
The configuration below are made for 2 kinds of systems:
(1) Host
(2) Systems in the same network
Steps to reach Network in Settings:
1. Choose your VM and click on Settings

2. In settings, Navigate to Network

The Adapter 1 is attached to NAT which provides internet access to your virtual machine.
We will now see host-only adapter and bridged adapter configuration below:
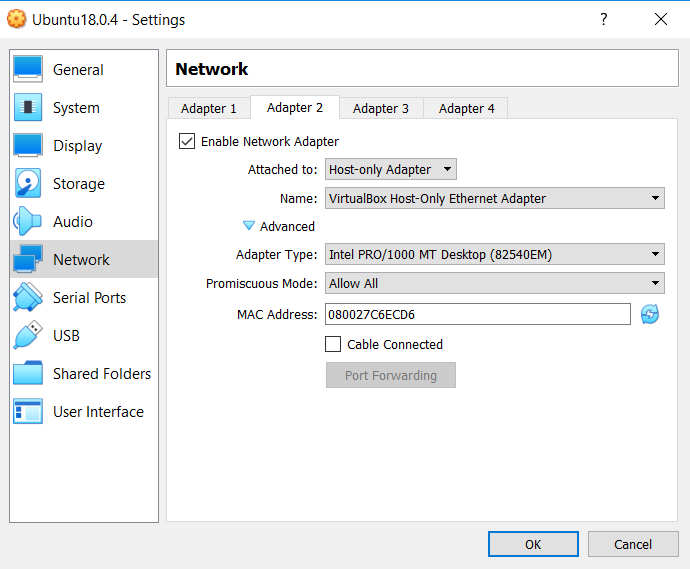
Host-Only Adapter Configuration:
1. Choose Adapter 2 Tab
2. Click on Enable Network Adapter (if not enabled)
3. Choose Attached to: Host-only Adapter
4. Specify a name to the adapter or use the default VirtualBox Host-only Ethernet Adapter
5. Click on Advanced
6. Accept the default selection of Adapter Type and MAC Address. You can also choose it as per your need.
7. Select Allow All in Promiscuous Mode.
8. Enable Cable Connected if virtual machine is on virtual network
The configuration looks as below:

Bridged Adapter Configuration:
1. Choose Adapter 3 Tab
2. Click on Enable Network Adapter (if not enabled)
3. Choose Attached to: Bridged Adapter
4. Specify a name to the adapter or use the defaultly specified adapter name
5. Click on Advanced
6. Accept the default selection of Adapter Type and MAC Address. You can also choose it as per your need.
7. Select Allow VMs or Allow All in Promiscuous Mode.
8. Enable Cable Connected [since all systems in the network (wired) need to access]
The configuration looks as below:


Click here to find how to access IPV4 address from each connection
1. Virtual Machine should be running
2. OpenStack Dashboard (Eg., http://127.0.0.1/dashaboard/) should also be open
3. Make sure the system does not sleep when you are accessing from outside.
Configuration Details:
In order to access OpenStack outside the Virtual Machine, you have to make few network settings in the hypervisor. Here, I have made use of Virtual Box to enable certain configuration.
The idea is the same but the way we do may differ from hypervisor to hypervisor. Check your hypervisor's complete details on network configuration.
The configuration below are made for 2 kinds of systems:
(1) Host
- It uses Host-Only Adapter configuration.
- Only the host and other guest machines installed in the host can access.
(2) Systems in the same network
- It uses Bridged Adapter configuration.
- All systems connected to the network, including the guests and host, can access.
Steps to reach Network in Settings:
1. Choose your VM and click on Settings


The Adapter 1 is attached to NAT which provides internet access to your virtual machine.
We will now see host-only adapter and bridged adapter configuration below:
Host-Only Adapter Configuration:
1. Choose Adapter 2 Tab
2. Click on Enable Network Adapter (if not enabled)
3. Choose Attached to: Host-only Adapter
4. Specify a name to the adapter or use the default VirtualBox Host-only Ethernet Adapter
5. Click on Advanced
6. Accept the default selection of Adapter Type and MAC Address. You can also choose it as per your need.
7. Select Allow All in Promiscuous Mode.
8. Enable Cable Connected if virtual machine is on virtual network
The configuration looks as below:
Bridged Adapter Configuration:
1. Choose Adapter 3 Tab
2. Click on Enable Network Adapter (if not enabled)
3. Choose Attached to: Bridged Adapter
4. Specify a name to the adapter or use the defaultly specified adapter name
5. Click on Advanced
6. Accept the default selection of Adapter Type and MAC Address. You can also choose it as per your need.
7. Select Allow VMs or Allow All in Promiscuous Mode.
8. Enable Cable Connected [since all systems in the network (wired) need to access]
The configuration looks as below:

Click OK to save the modified network configuration settings.

The enabled network settings will be displayed in the summary page.
With this, the configuration process is over. Now Start the VM.
1. Click on the top right corner of Ubuntu Desktop
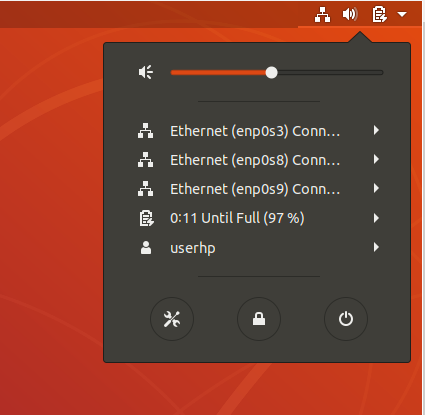
2. You will have 3 Ethernet connections:
- enp0s3 (NAT)
- enp0s8 (Host-only)
- enp0s9 (Bridged)
Note the IPv4 Address under each connection's wired settings.
3. Use the IPv4 address of Host-only connection (enp0s8) only in your host and other guests installed in the host.
4. Use the IPv4 address of Bridged connection (enp0s9) in any system connected to your network
5. Access as http://xx.xx.xx.xx/dashboard/ in the browser
(where xx.xx.xx.xx is the IPv4 address)
Once all configuration is over and IP is accessed in the host / system browser,
make sure of the following:
2. OpenStack Dashboard (Eg., http://127.0.0.1/dashaboard/) should also be open
3. Make sure the system does not sleep when you are accessing from outside.
Enjoy OpenStack with one installation & multiple access!
Comments
Post a Comment