This post will elaborately discuss how to set up your openstack environment for remote access.
Description:
Openstack has already created two networks during installation process:


This is the overall structure we need to achieve to ensure that the Instance will have Remote Access from the Public Network.
Setting up Remote Access:
Login to openstack dashboard with the credentials.
1. View Network Topology
(1) Go to Project -> Network -> Network Topology
(2) Switch to the graph tab and view the existing networks
(3) Check it again after creating router and interface.
2. Create Router
(1) Go to Project -> Network -> Routers
(2) Click Create Router
(3) Specify the router name
(4) Keep Admin State enabled (checked)
(5) Dont choose External network (we will do it in step 3)
(6) Click Create Router
The new router is displayed now.
3. Set Gateway
(1) In the routers page, against your router you will find Set Gateway
(or)
Click on the newly created router's name and you will find Set Gateway on the top right
(2) Click Set Gateway
(3) Choose public from External Network
(4) Click Set Gateway
You will get a message stating Gateway interface is added.
The router is now connected to the public network via gateway interface.
4. Add Interface
(1) Click on the router's name
(2) Go to Interfaces Tab
(3) Click Add Interface
(4) Under Subnet, select the shared subnet
(5) The IP Address is optional, so leave it blank
(6) Click Add Interface
Your new interface will appear in the list along with the gateway interface.
Thus, the shared network is now connected to the router.
You can check the Network Topology after each step to know how this connection is made.
When an instance is connected to the shared network, it can be accessed remotely via this router.
Description:
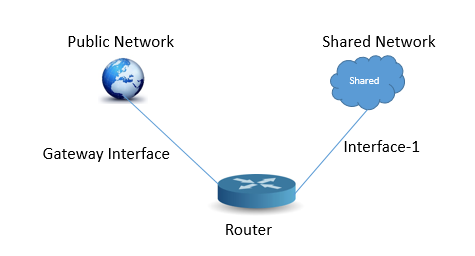
Openstack has already created two networks during installation process:
namely, (i) public and (ii) shared.

We have to connect to a router to get remote access.
For this, we will need to create two interfaces to establish connectivity.
(i) Gateway Interface between Router and Public Network.
(ii) Interface-1 between Shared Network and Router.
The instance will have to be assigned to the shared network as below:

Setting up Remote Access:
Login to openstack dashboard with the credentials.
1. View Network Topology
(1) Go to Project -> Network -> Network Topology
(2) Switch to the graph tab and view the existing networks
(3) Check it again after creating router and interface.
2. Create Router
(1) Go to Project -> Network -> Routers
(2) Click Create Router
(3) Specify the router name
(4) Keep Admin State enabled (checked)
(5) Dont choose External network (we will do it in step 3)
(6) Click Create Router
The new router is displayed now.
3. Set Gateway
(1) In the routers page, against your router you will find Set Gateway
(or)
Click on the newly created router's name and you will find Set Gateway on the top right
(2) Click Set Gateway
(3) Choose public from External Network
(4) Click Set Gateway
You will get a message stating Gateway interface is added.
The router is now connected to the public network via gateway interface.
4. Add Interface
(1) Click on the router's name
(2) Go to Interfaces Tab
(3) Click Add Interface
(4) Under Subnet, select the shared subnet
(5) The IP Address is optional, so leave it blank
(6) Click Add Interface
Your new interface will appear in the list along with the gateway interface.
Thus, the shared network is now connected to the router.
You can check the Network Topology after each step to know how this connection is made.
When an instance is connected to the shared network, it can be accessed remotely via this router.
Comments
Post a Comment