This part of JOSSO environment discusses how to create and model an appliance.
Login to the Atricore Console: (Enable Flash in your browser)
URL: http://localhost:8081/atricore-console
Username: admin
Password: atricore
We will create a new identity appliance, model it using the following building blocks:
(i) Provider
(ii) Identity Sources
(iii) Resource
(iv) Execution Environment
(v) Connection
Click here to look Implementation Structure
These blocks are available in the right side of the environment.
Whatever blocks we use, it gets added up in the left side.
The centre section shows the visual modelling of the appliance.
The need for every building block along with its usage are explained in the official documentation.
Kindly go through it for a quick study on the blocks.
Click here for Documentation Reference by JOSSO
The process is as follows:
(1) Creating New Identity Appliance
(2) Modeling the Appliance
(3) Activating the Execution Environment
(4) Manage Users
(5) Build & Deploy Appliance
(6) Test the Appliance
---------------------------------------------------------------------------------------------------------------------------------
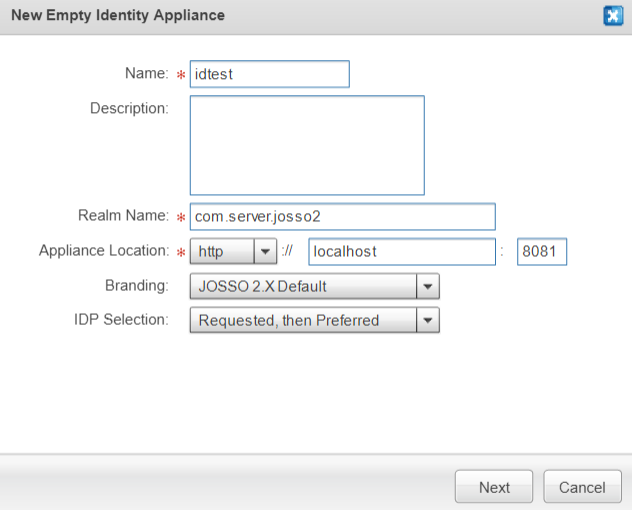
(1) Creating New Identity Appliance:
1. Go to Identity Appliance Modeler tab.
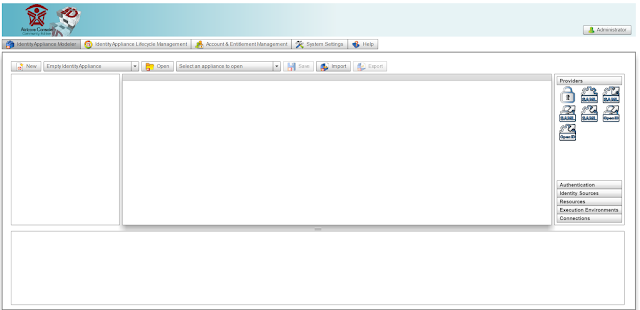
2. Click New next to Empty Identity Appliance. This will create a new appliance.
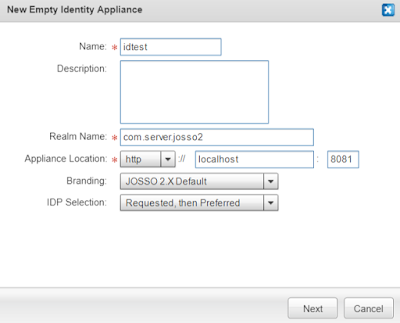
3. Fill in with details below. Click Next.
4. Leave it as it is. Click Next.

5. Click Confirm.


6. The visual modeler looks like:


19. Click OK and the modeler looks like:


22. Click OK and the modeler looks like:


Once activation is done, we have to create users to access login page of this appliance via Account and Entitlement tab.
Click here to know how to manage users in Account and Entitlement
(5) Build & Deploy Appliance:
We can build and deploy this appliance via Identity Appliance Lifecyle Management tab.
Click here to know how to build & deploy in Identity Appliance Lifecycle Management
(6) Test the Appliance:
Once the application is deployed and started,
1. Open the Resource Location URL in browser - http://localhost:8080/partnerapp/
2. The anonymous login page is shown:

3. Click Login and you will be taken to the login page.
http://localhost:8080/partnerapp/protected/ will directly take you to this page.

4. Login with the user credentials created in Account and Entitlement under role1 group.

5.The welcome page with logged in user name and log out link is displayed as below:

Thus, we have logged in to the sample application. Click log out to log out of this page.
For any errors, kindly refer Fixes for JOSSO Execution Related Errors
Login to the Atricore Console: (Enable Flash in your browser)
URL: http://localhost:8081/atricore-console
Username: admin
Password: atricore
We will create a new identity appliance, model it using the following building blocks:
(i) Provider
(ii) Identity Sources
(iii) Resource
(iv) Execution Environment
(v) Connection
Click here to look Implementation Structure
These blocks are available in the right side of the environment.
Whatever blocks we use, it gets added up in the left side.
The centre section shows the visual modelling of the appliance.
The need for every building block along with its usage are explained in the official documentation.
Kindly go through it for a quick study on the blocks.
Click here for Documentation Reference by JOSSO
The process is as follows:
(1) Creating New Identity Appliance
(2) Modeling the Appliance
(3) Activating the Execution Environment
(4) Manage Users
(5) Build & Deploy Appliance
(6) Test the Appliance
---------------------------------------------------------------------------------------------------------------------------------
(1) Creating New Identity Appliance:
1. Go to Identity Appliance Modeler tab.

2. Click New next to Empty Identity Appliance. This will create a new appliance.
3. Fill in with details below. Click Next.

5. Click Confirm.

6. The appliance idtest is created.

Now, we will start modeling the appliance.
(2) Modeling the Appliance:
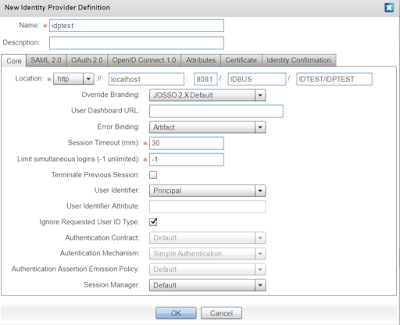
1. Click Identity Provider from the Providers list and Drag it to the centre.
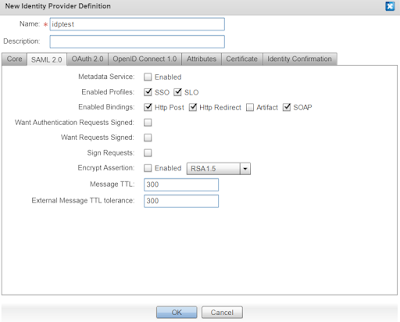
2. Fill in the details as below under Core and SAML 2.0:
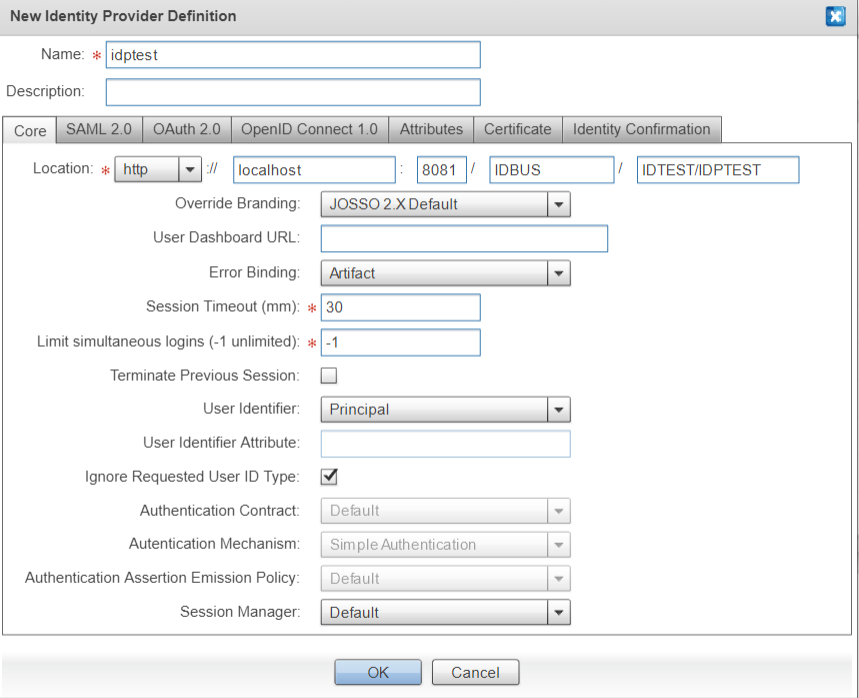

3. Click OK and the visual modeler looks like:

4. Click Identity Vault from Identity Sources list and drag it to the modeler.
5. Name it as below and Click OK.


7. Click Identity Lookup from Connections list
8. Drag it to connect idptest and idvtest.

9. Click SAML - Internal Service Provider from Providers list and drag it to modeler
10. Check for values under Core and SAML 2.0


11. Click OK and visual modeler looks like:

12. Since a data store is needed, we create another identity vault from identity sources as below:

13. Modeler looks like:

14. Establish Identity Lookup from Connections between sptest and userstest

15. Establish a Federated Connection from Connections between idptest and sptest.
(Click and Drag Federated Connection and connect idptest and sptest)
Accept the defaults under Identity Provider Channel and Service Provider Channel.
(Those values are retrieved from the respective providers when we created it.)


16. Click OK and the modeler looks like:

We have to connect an execution environment for the service provider. In JOSSO 2.4.* versions, we cannot connect a service provider directly to an execution environment. Instead, we need a resource to be connected in between them like: service provider - resource - execution environment.
17. From Execution Environments, Click Tomcat Execution Environment and drag it to modeler.
18. Choose the version of tomcat and the installation directory of tomcat should be mentioned in Install Home. Check Overwrite Original Setup and Install Demo Applications.
This is typically the path specified in CATALINA_HOME environment variable. (Refer to Installation of JOSSO)
Install Demo Applications will install the login pages necessary to test this appliance.

19. Click OK and the modeler looks like:

20. Click and drag JOSSO1 Resource from Resources list.
21. Location must be set to the server address.
Eg., Tomcat server runs on https://localhost:8080/
We have to add partnerapp so that demo applications get installed there.

22. Click OK and the modeler looks like:

21. Establish Service Connection from Connections between sptest and josotest
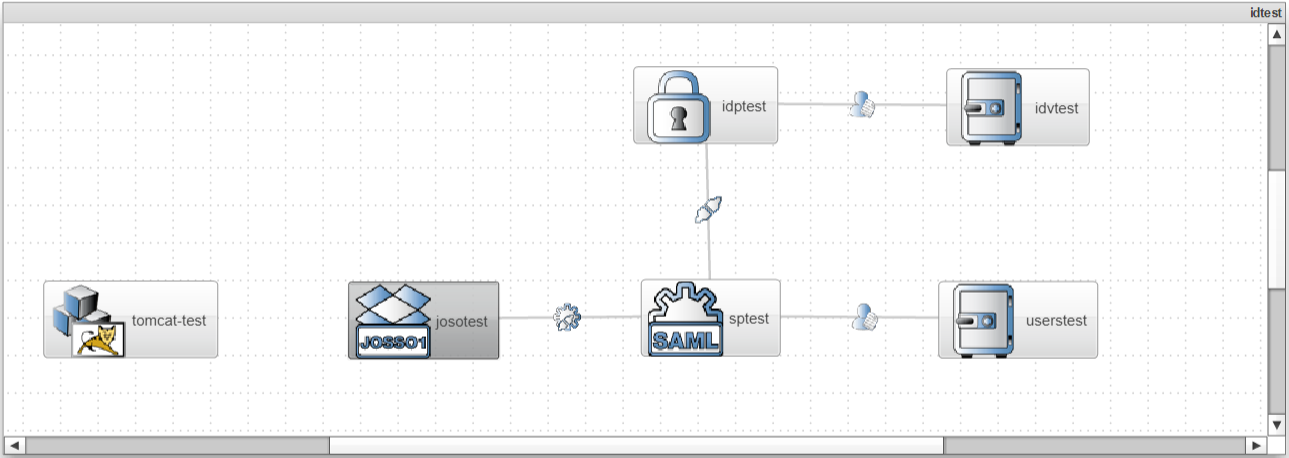
22. Establish Activation Connection from Connections between tomcat-test and josotest

23. Click Save to save this appliance.
(3) Activating the Execution Environment:
1. Once saved, we need to activate the execution environment. To do this, click tomcat-test.
2. Under the modeler, the properties pane will open. Go to Activation tab.

3. Click Reactivate and it asks for confirmation as above.

4. Click OK.

5. The activation process takes place. At the same time, the command-prompt we have opened will execute few commands as below:

(4) Manage Users:
Click here to know how to manage users in Account and Entitlement
(5) Build & Deploy Appliance:
We can build and deploy this appliance via Identity Appliance Lifecyle Management tab.
Click here to know how to build & deploy in Identity Appliance Lifecycle Management
(6) Test the Appliance:
Once the application is deployed and started,
1. Open the Resource Location URL in browser - http://localhost:8080/partnerapp/
2. The anonymous login page is shown:

http://localhost:8080/partnerapp/protected/ will directly take you to this page.

4. Login with the user credentials created in Account and Entitlement under role1 group.

5.The welcome page with logged in user name and log out link is displayed as below:

Thus, we have logged in to the sample application. Click log out to log out of this page.
For any errors, kindly refer Fixes for JOSSO Execution Related Errors
Comments
Post a Comment